Tutorials All - Webdesign, Graphic Design

Visit our new Webdesign Templates,css,html5 etc

Download New Android Applications

Visit our new Collections of Android Application

28.2.11

Making PowerPoint slides and navigating them


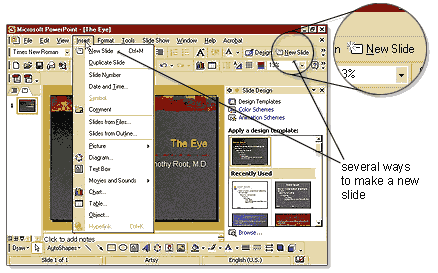
Now that we’ve chosen a template and saved our presentation, let’s add some slides. But how do we do it? There’s actually three ways, and over time you’ll start to favor one of them:
  1. Go to the file menu, click [Insert - New Slide] (for the logical mind)
  2. Go to top toolbar, find the “new slide” button (for the visual mind)
  3. Type the keyboard shortcut [Control + M] (for the robotic personality)

When you add a new slide, PowerPoint wants to know what “slide layout” you prefer. Slides have different layouts, or arrangement of text and objects … i.e. a title slide looks different than a “normal” slide.
You can pick and change these layouts by going to the “apply slide layout” pane in the task pane. There are a lot of slide formats we can choose from, such as ...

Saving your PowerPoint Show


Organization is really important when you are creating and saving your PowerPoint presentations.
Actually saving your presentation is quite easy. Simply go to the file menu, click save, and choose a name and place on your hard-drive to save too. The resulting PowerPoint file will have the ".ppt" extension. You can then copy this PowerPoint file onto a CD-ROM or floppy disk (if it is small enough) or even email the show to a friend.
However … there are a couple of caveats!!!
  1. All pictures used in your presentation will be incorporated into the .ppt file. This is good because it keeps your images together. Unfortunately, photographs and pictures tend to be large and will quickly bloat the size of your presentation. A bunch of photos from your digital camera can easily increase your PowerPoint .ppt file to over 100 megs in size! That’s big.
  2. Sound and video do NOT incorporate into your .ppt file, unless they are very small (like the short “sound bites” included with PowerPoint). These files are instead “linked” to the PowerPoint .ppt file. When you run your presentation, PowerPoint looks for the video file where it expects to find it (typically in the same directory) and then plays the video file. If the video file is NOT where it was when you first created the show, PowerPoint won’t find it and the file won’t play!

How to use PowerPoint templates


You’ve opened PowerPoint and you’re ready to design your first presentation. But how do you begin? There are a couple of approaches you could take, depending upon your temperament and design skills.
  1. You could jump right in and start typing text, adding background colors, and experiment with your font colors and styles. (not recommended)
  2. You could use a pre-configured template.
Unless you have great design skills, I recommend creating your first presentation using a pre-made template. Microsoft has done us a favor … they’ve hired a team of artists and graphic designers, people with experience with color-schemes and typography, to design a large collection of “template” styles. These templates come complete with backgrounds, pictures, and pre-chosen fonts and colors.
The quality of these pre-installed templates is actually pretty good, though some may need a little "tweaking" to look perfect. If you aren’t satisfied with the default templates, you can also find free templates online. There are also many websites out there selling professional-looking templates.
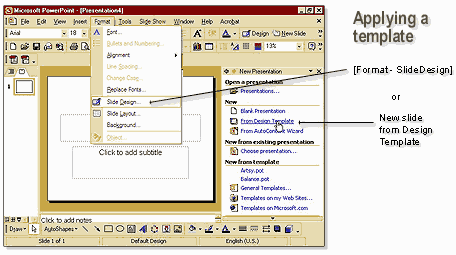
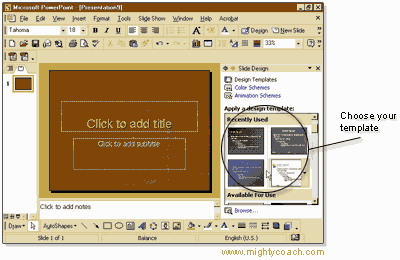
There are a couple of ways to apply a template. When you first open up a blank PowerPoint presentation, go over to the task pane and choose a template. If you can’t find the templates in the Task Pane, go up to the file menu and click
[Format – Slide Design]


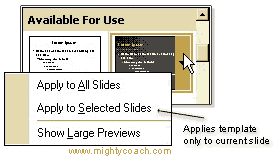
When you click on the template thumbnail, the style is applied to your slide. Actually, the template changes allyour slides. If you only want the currentslide to change, click the little arrow to the right of the template button and chose [apply to selected slides].
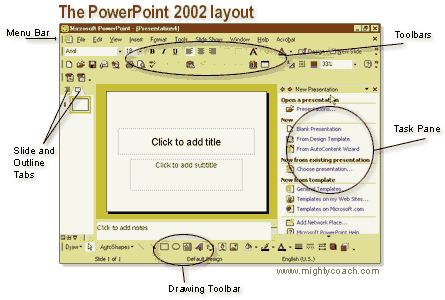
The Powerpoint 2002 Interface


In this video, we'll discuss the basic layout of the PowerPoint interface. Fortunately, PowerPoint looks and works just like other Microsoft Office products (like MS Word). And, just like in Word, PowerPoint “slides” can be created and edited like “pages” in a word processor.
After opening PowerPoint, there are a couple of important areas of the interface to examine. There is, of course, the traditional menu bar. Underneath this are several rows of toolbars that contain buttons for common functions you might need … like changing your fonts and paragraph alignment.


What’s new in PowerPoint 2002?


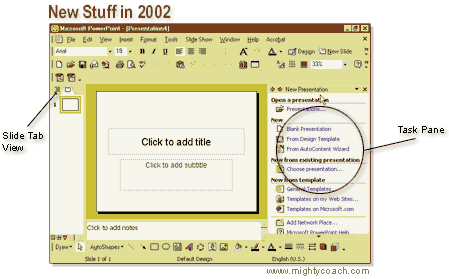
In this video, we’re going to look at the new features of PowerPoint 2002 (compared to older versions). If you’re migrating from an older version of PowerPoint, you’ll notice some major differences right away. Fortunately, these changes are mostly cosmetic.
  1. Task Pane: The biggest change in PowerPoint 2002 is the addition of the “Task Pane.” This is the large window on the right portion of the screen. The task pane lists common functions that you’ll need as you create your presentations (functions that used to be only accessible through the file pull-down menus and pop-up windows). The task pane is “somewhat” helpful, though it takes a time getting used to it.

     
  2. Slides Tab View: In the left portion of the screen, where the “outline view” area is located, there is now a new tab called “slides.” When you click this, you will see little thumbnails of your slides. This is a great addition to PowerPoint, especially for people (like me) who don’t really use the features of the Outline View. The "slides tab view" even allows you to rearrange your slide order by simply dragging the thumbnails up and down. 

Why should you use PowerPoint 2002?


Why should you use PowerPoint? That's a good question. Before we begin this extensive PowerPoint course, let's answer a couple of important questions:
1. What is PowerPoint?
Basically, PowerPoint is a software package that allows you to create professional multimedia presentations. As opposed to the traditional presentation formats (such as slide projectors), PowerPoint has many of advantages:
  • Many viewing options: You can view your presentation in many different places … on a computer monitor, LCD projector, and you can even export your show onto the web.
  • Printing: You can easily print copies of your slides and hand them out to your audience. This is great for teachers and educators, and students like it because they don't have to take as many notes.
  • Fast updates: You can update and fix your presentation at a moments notice (even minutes before your live presentation). No need to run to Kinko’s to have new (and expensive) slides prepared

Top 10 Websites to Download PowerPoint Presentation Templates for Free


1. TemplatesWise

TemplatesWise.com is the best available resource for free PowerPoint backgrounds and Presentation templates. It has a huge collection of templates that are constantly updated. It is also sorted in frequently searched categories which make it even simpler to find the best suited PowerPoint template for you.
A Few of the PowerPoint Templates available at Templates Wise can be seen below.
Top 10 Free Presenation WebsitesTop 10 Free Presenation WebsitesTop 10 Free Presenation Websites

2. Free-Power-Point-templates

Free-Power-Point-Templates.com has a collection of more than 1000 Presentation templates and PowerPoint backgrounds available for free download. The best feature about this website is its search feature which provides accurate results to find the perfect Presenation template for you. And when you are viewing a particular template, related PowerPoint templates are displayed for you to continue searching.
A few of the Presentation templates available at fppt.com can be seen below.
Top 10 Free Presenation WebsitesTop 10 Free Presenation WebsitesTop 10 Free Presenation Websites

Create a PowerPoint Template


Much of the PowerPoint world has no design training and yet people are expected to create presentations that are a combination of aesthetics and content. Luckily, part of that problem can be resolved if you start with a good template. So this article talks about templates. Many people don't know how to create templates, so I'm going to explain how you do it.
For this template creation tutorial, I created a pair of coordinated backgrounds in Adobe Photoshop. You can download them here:http://www.indezine.com/misc/007templates.zip (70 kb)
These instructions are for PowerPoint 2002 / 2003 – and should work in PowerPoint 97 and 2000 as well. Once you have created a template, you should have no problem using it in PowerPoint 97, 2000, 2002 and 2003. In fact, you can also use them on Mac versions of PowerPoint (98, 2002, ‘X' and 2004).
  1. Open PowerPoint and choose File|New. The New Presentation task pane appears. Click the Blank presentation option.
  2. Choose View|Master | Slide Master. Choose Insert|New Title Master. You see two slide previews in left pane. Both previews are linked through a connector. The top preview represents the slide master and the bottom preview represents the title master. Any elements you place within these masters show up on all of the slides based on them. The title layout slides are based on a title master. All of the other slide layouts are influenced by the slide master. (PowerPoint has more than 26 slide layouts, which you find in the Slide Layout task pane.) 

PowerPoint Tutorial - Applying Templates


Applying an existing template
PowerPoint calls its built-in color schemes Design Templates. Design Template can only be applied to all slides of a presentation. To make design changes in certain slides only, see section oncustomizing background.
  • From the Format menu, choose Apply Design Template
  • Clicking the various presentation options shows thumbnail views of their designs. Click "OK" to choose one.
Creating a new template using masters
back to top
Like Design Templates, Masters allow you to make design decisions that will then affect each slide or page in the presentation. There are masters for Slides, Title Slide, Handouts and Notes.
Each Design Template has its own Slide Master that can be altered. If you create slides from scratch, a consistent style can be added to the presentation by formatting the Slide Master.
  • Select View menu < Master < Slide Master (or another master from the list)

How to use PowerPoint templates


You’ve opened PowerPoint and you’re ready to design your first presentation. But how do you begin? There are a couple of approaches you could take, depending upon your temperament and design skills.
  1. You could jump right in and start typing text, adding background colors, and experiment with your font colors and styles. (not recommended)
  2. You could use a pre-configured template.
Unless you have great design skills, I recommend creating your first presentation using a pre-made template. Microsoft has done us a favor … they’ve hired a team of artists and graphic designers, people with experience with color-schemes and typography, to design a large collection of “template” styles. These templates come complete with backgrounds, pictures, and pre-chosen fonts and colors.
The quality of these pre-installed templates is actually pretty good, though some may need a little "tweaking" to look perfect. If you aren’t satisfied with the default templates, you can also find free templates online. There are also many websites out there selling professional-looking templates.
There are a couple of ways to apply a template. When you first open up a blank PowerPoint presentation, go over to the task pane and choose a template. If you can’t find the templates in the Task Pane, go up to the file menu and click

How to upload video to Facebook

Facebook is not just about still pictures; you can upload your videos to easily share them with your network. You can also record and share video greetings for friends. In order to keep junk videos out though, Facebook requires that you or someone in your network appears in the video. You can even send videos straight from your phone to Facebook!


Download this episode now

How To Create a Twitter Account Using SMS


New Twitter User?

Want to start sending Tweets from your mobile phone? Just follow the steps below from you phone to set up your brand new Twitter account and begin tweeting via SMS.
(Already have an account? You'll need to read our article about adding your phone via SMS, oradding your phone via web for instructions.)

To create your new Twitter account...

  1. Send a text message to your Twitter shortcode (such as 40404 in the U.S.) with the word'START'
  2. Twitter will send you a reply and ask you to reply with the word 'SIGNUP' to create a new account. Send 'SIGNUP'.
  3. Next, Twitter will ask you to pick a username. Your username must be unique and less than 15 characters. Reply with the username you want (see below for advice on picking a username).
  4. You will get a confirmation message when you pick a unique username (Twitter will tell you to pick a new name if someone else has the username you wanted).
  5. Choose a password.
  6. You're all set! Send a message and it will post as your first Tweet

How to Make Your Own Maps Using a Handheld GPS

How to Make Your Own Maps Using a Handheld GPS 


A handheld GPS unit is a great tool to bring if you are traveling. With the GPS unit you will be able to find your way around without solely relying on other individuals'advice and recommendations, which may vary from local to local. In addition, it is even possible to create your own map of a specific area using a handheld GPS unit.


Step 1
Download and install GPS Track Maker at http://www.gpstm.com/downloadscontract.php (link provided in Resources). This software allows you to create your own maps with your GPS unit.
Step 2
Connect your handheld GPS unit to the computer via USB cable (provided when purchased). The computer should detect the unit.
Step 3
Open the program once it has finished the installation. Select "Tools" in the menu and click "Select Map Icon." The program uses your GPS unit and allows you to select a location that you would like to create a map out of.

Step 4
Click the map adjust tool and place the mouse onto the crosshairs of the image. This gives you a latitude and longitude. Insert this into the handheld GPS unit as your location.
Step 5
Save your Track Maker file and select the option to import the map into the Word Web's digital chart. This connects you to an Internet site that allows you to add specific content to your map, such as land elevation, sea level, altitude, and highway markers, as well as the city, state or country of your map. Essentially, you can add any particular aspect of a map that you want.
Step 6
Select the desired country. From here you can select the options of including elevation, roads and other features on your map (depending on what you want to use the map for). Save this new file and re-import it into the Track Maker program.
Step 7
Select "Options" and import the new map into your handheld GPS unit. It will take only a moment for your GPS unit to receive the map. Once the upload has completed you will be able to use the new map that you created on the GPS Unit.
Resources
Greyson Ferguson is a graduate of the Savannah College of Art and Design with a degree in film and television. He currently resides in Lansing, Michigan where he works on independent film projects and writes for numerous publications. Ferguson primarily focuses on computer and electronic articles. Greyson produces TheDailyUpbeat.com, focusing on only upbeat news stories with daily updates.

Creating and Using C# DLLs


Introduction

In this article, I would like to explain how to create and use DLLs in C Sharp. Before writing code, we will examine some basics of a DLL in the .NET framework; for example, how it's loaded in the process address space, how CLR is initialized, and the mechanism behind the screen. First, we will talk aboutMSCorEE.dll; you will find this guy in the %windir%\system32\ directory.MSCorEE.dll stands for Microsoft Component object runtime Execution Engine. The existence of this file tells you that you have installed the .NET framework in your system. This DLL is responsible for initializing the CLR.
Whenever you create an assembly, the compiler/linker emits the following 6-byte x86 stub function into the PE file's .text section:
JMP _CorExeMain for Exe or JMP _CorDllMain for Dll.

How to change Gmail password


Gmail uses Google Account credentials to authenticate and log you in. Basically Google account is the same as Gmail account. Passwords are the same too.
You will need to know your current password to be able to change Gmail password to something different.
If you don't remember your current Gmail password you might still be able to change it if you remember the answer to the security question that was set on your account when you registered it.
There are other emergency recovery methods if you don't remember your current Gmail password or security question associated with your Gmail account. We cover the emergency cases lower down on this page.

How To Resize Images And Maintain Original Sharpness

You have a nice big beautiful photo. It is gorgeous. But you need it much, much smaller, and by the time the file is down to the right size, you might find that the image has started to take on a blurry look. This is a real problem with resizing images, but luckily in Photoshop there's a very simple solution.

This tip will only work with Photoshop CS and CS2. If you don't have a CS version yet I recommend you try and get one as soon as you can, because they are full of powerful new features. For earlier versions of Photoshop there's a workaround at the end of this tip.

When you want to reduce an image go to the Image> Image Size menu. Click onResample Image and choose Bicubic Sharper from the drop-down menu. This is the best setting for making sure that an image doesn't blur. The example photo of the flower started at 2,000 pixels across. I stepped it down to 250, and then again to 125 with almost no loss of sharpness. For enlarging an image select Bicubic Smoother.

Adobe Photoshop tutorialI found this to be such an effective trick that I wished it had been the default setting in Photoshop for the Image Size menu from the start. Then I discovered I could set it as the default myself. All you need to do is go to Preferences> General and you'll see Image Interpolation and there you can pick Bicubic Sharper from the choices.

Another thing to keep in mind when resizing is to try to do it only once on an image. Many people will resize repeatedly as they search for the perfect fit for a design element, and then end up with an image with a lot of blur. It's always better to experiment on a duplicate of the image. Then, when you've settled on the final dimensions, you can go back to the original and resize it just once.


CSS Image optimization

mage optimization, plays a majore role inorder to load your page faster. There are many good image editing tools that allow us to get the best visual result for a certain file size, but they lack in quality. Saving bytes has never been so easy. Smushit! is a service that goes beyond the limitations of Photoshop, Fireworks & Co. It uses image format specific non-lossy image optimization tools to squeeze the last bytes out of your images - without changing their look or visual quality. This tool now is also recommended by YAHOO andGOOGLE.

How it Works
You can give any format image like gif, jpeg or even png. Smushit will convert your given format file into png8 format. PNG true colors such as png24 will not support by ie6, but png8 will be supported by all leading browsers.

How firefox3.5 will be useful for web developers?

Firefox3.5 is 10 times faster than firefox2 versions. A good news from mozilla, that firefox3.5 have many new features for web site and application developers.

HTML 5
Using audio and video in Firefox. In the older version of firefox, you need to download a plugin for flash to view the videos in Youtube. But using firfox3.5 and HTML5 you can view the videos without any plugins installed. And also they are very faster than ever.

Offline resources in Firefox
Firefox 3.5 now fully supports the HTML 5 offline resource specification.

How to Create Optimized Landing Pages that Convert?

Like SEO, SEM plays a major role in promoting the website to make revenues on the basis of ROI. The online business battle will be waged over conversion rates and return on investment (ROI), not traffic acquisition. The Landing page is the key factor inorder to make conversions rather than investing in an normal page.

Successful landing page
Your landing page should look like

1) Clear informative layout
2) Use Catchy Headlines, catchy titles are a plus.
3) Using contextual internal links
4) Should focus on What's the offer?
5) Who's interested?
6) Why are they interested, and why should they take further action?
7) How do they get started?

Popular CSS Frameworks - Yahoo YUI, 960 CSS, Blueprint, Yaml, jQuery

Tried of writing HTML, CSS code to your web pages? Making your site to work with all the major browsers. Running behind CSS hacks? Here is a simple way to solve all your issues, CSS Frames. Most of the designers would heard about CSS Frames, for those who don’t know here is a brief description from: Wikipedia

A CSS framework is a library that is meant to allow for easier, more standards-compliant styling of a webpage using the Cascading Style Sheets language. Just like programming and scripting language libraries, CSS frameworks package a number of ready-made options for designing and outlaying a webpage.

5 Popular CSS Frameworks
1) Yahoo YUI (Yahoo User Interface Library)
2) 960 CSS Framework
3) Blueprint CSS Framework
4) Yaml (Yet Another Multicolumn Layout)
5) The jQuery UI CSS Framework

Nifty rounded corners using html and css

Rounded border
HTML Code:

<b class="b1"></b><b class="b2"></b><b class="b3"></b><b class="b4"></b>
<div class="contentb">
<div>Round Border!!</div>
</div>
<b class="b4"></b><b class="b3"></b><b class="b2"></b><b class="b1"></b>

CSS Code:
.b1, .b2, .b3, .b4{font-size:1px; overflow:hidden; display:block;}
.b1 {height:1px; background:#888; margin:0 5px;}
.b2 {height:1px; background:#fff; border-right:2px solid #888; border-left:2px solid #888; margin:0 3px;}
.b3 {height:1px; background:#fff; border-right:1px solid #888; border-left:1px solid #888; margin:0 2px;}
.b4 {height:2px; background:#fff; border-right:1px solid #888; border-left:1px solid #888; margin:0 1px;}
.contentb {background: #fff; border-right:1px solid #888; border-left:1px solid #888;}
.contentb div {margin-left: 5px;}

How to have div min height

Basically when you specify a height to a div, ie6 will take it as minimum height. But ie7, firefox, chrome and modern browser will treat as height. So here is a simple way to have minimum height to all web browser.

Css Code:
.test{min-height:50px;height:auto!important;height:50px;}

For example, if you want to give 50px height to a div, Use the above code will work fine. That after 50px the height of the div will automatically expands.

ie6 double float margin bug

Webdevelopers gets irritated when they give a margin value to a block, suddenly only in ie6 they can see the value gets doubled. For example: if you give margin-left:10px, ie6 will take the value as 20px. Thank god they have fix this issue in ie7. This is because, when the float margin goes in the same direction as the float and is trapped directly between the float and the inside edge of the container box. Any other left-margined floats that are displayed in the same row won't show the doubled margin.

The simple way to handle this issue is to put display inline fix. By placing this will not affect any other browsers.

For Example:
.fltt{
float:left;
width:300px;
margin:5px 5px 0px 10px;
display:inline;
}

How to make a website run faster?

These are the simple steps to be followed, when developing a website to make it run faster. First of all installYslow or Page speed, then start looking the ways your site is unoptimized.

1. Use minifed Javascript and CSS, Avoid duplicate JS and CSS.
2. Put your CSS at the top of the document.
3. Put the javascript at the end. 
4. Use seperate domain for images, javasripts etc...
5. Avoid URL Redirections
6. Use Image Sprites to Minimize HTTP Requests
7. Add an Expires or a Cache-Control
8. Use Gzip Components
9. Compress your images using Smushit or good image compressor.
10. Compress your css and javascripts using Yahoo User Interface Compressor.

These point will help you to run your site faster. You can also test your page (i.e) load test through online using Pingdom website.

How to give text shadow using css

Here is a simple way to give shadow to a text using css.

HTML:
<div id="wrapper">
<span class="firstlayer">Text with shadow using CSS</span>
<span class="secondlayer">Text with shadow using CSS</span>
</div>

CSS:
.firstlayer {
font-size: 18px;
font-weight: bold;
color: #aa0000;
position: absolute;
top: 120px;
left: 20px;
z-index: 1;
}

Vertical align text in floating div using css

Do you know how to vertically align a text in a floating div? When a content is dynamically generated and you want to align it automatically according to it?

Today i was experimenting about this for a long time and finally i have got a solution which will work in all the browsers including ie6. There are many ways of doing it, but i would like to work the code in all the majore browsers inculding ie6.


So here is the code...
Your Ad Here
HTML:
<div class="contentdiv">
<p>It works! Vertically Center Align!</p>
</div>

CSS:
.contentdiv{ width: 135px; height: 84px; display: table; border:2px solid red;}
.contentdiv p{ display: table-cell; vertical-align: middle; text-align: center;}

Hack for ie:
.contentdiv p{*margin-top: expression(this.offsetHeight < this.parentNode.offsetHeight ? parseInt((this.parentNode.offsetHeight - this.offsetHeight) / 2) + "px" : "0");}

According to the height you increase, the content will get vertically aligned center. My only worry is iam using expression. We must try to avoid using more expression. But it looks very simple. Fine, any other method of handle this will be a great help! Please feel free to post.

Rounded corners using css

The simple way of using rounded corners using css with the header and the content in it.

HTML:
<b class="b1h"></b><b class="b2h"></b><b class="b3h"></b><b class="b4h"></b>
<div class="headh">
<h3>Here is your Header!</h3>
</div>
<div class="contenth">
<div>No images!</div>
</div>
<b class="b4bh"></b><b class="b3bh"></b><b class="b2bh"></b><b class="b1h"></b>


CSS font replacement technique

Many of us would like to have headers with nice custom fonts on our website. For instance, logo which we like to have in an attractive graphics. But this stuff can be done only with the help of <img> tag, not with the regular text.

The proper HTML tag to use for headers is the header tag (e.g. <h1>, <h2>, etc). This is best for accessibility as well as SEO. Instead of using an image, we will think that having a text based logo will be much preferable for more SEO point of view even though we have an alt tag to the image. But text might not give you an attractive look. So how to use css font replacement technique to use both text as well as image in logo.

You may also be aware that CSS allows us to place background images on elements. Also text indent to align the text. We can use a proper header tag, but also use an image.
We need to somehow hide the text so that only the image is visible. Here it goes...

HTML:
<h1 class="logo">
Webdevelopertut
</h1>

CSS:
h1.logo {
width: 200px; height: 175px;
background: url("images/logo.jpg");
text-indent: -9999px;
}

Basically this technique creates the text goes way off the screen to the left. The text is being left-justified and cannot be seen. instead image is placed in the top left of this box.

When both css and image is on or off this method will get pass and fails when css is on and image is off. Most of them are now following this technique.

Principles for keeping your code clean

The art of writing HTML and CSS is the foundation of a beautiful website. The advantages of clean, semantic HTML are many, but so many websites suffer from poorly written markup.

Most of the attractive website have beautiful designs but fails to pass in the w3c validations. This is because of bad coding. These are the basic and most follow principles for keeping your code clean and have a semantic structure. They are as follows...

1. Strict DOCTYPE
2. Proper indentation
3. Nest your tags properly
4. Character set & encoding characters
5. Eliminate unnecessary divs
6. Use better naming conventions
7. Leave typography to the CSS
8. Use Class/id the body tag
9. Keep your CSS and JavaScript external
10. Validation

This will be a great start to write clean HTML, but there is still lots more. When starting from scratch, this seems to be much easier. When trying to fix existing code, it feels a lot more difficult. SO from the next project, just think what you can make it right.

Float bug fix in div to expand

Many of would find a problem when using a block(div) called a container with the background color, where you don't want to use float or height to the div. And in the inner div of the container you want to give float to it.

You can find this issue in most of the browser like iefirefox, the container will not expland as the inner div.

Yahoo’s Text-Sprite Generator

Some of them called it as Yahoo's secret text sprite generator, because i think yahoo has not publish it officially. This is a pretty cool stuff by yahoo, which will generate a sprite to the text given.

Basically it’s a URL you can hit which will create a perfect sprite-ready PNG graphic of the text you include in the URL. Check it out for yourself:

Here is the url...
http://l.yimg.com/img.sports.yahoo.com/static/bir/headline?txt=webdevelopertut

Just copy the link and paste it in the address bar. You can have your own text just like i have used webdevelopertut. The image generated is always 468×68px and the color is white on top and yellow-orange on the bottom. Where you can use it for hover also.


For SEO, you can use CSS font replacement technique to have both text and image versions.

Png fix for ie6 using css

Many of the cases we would be like to have a transparent image, which is other wise called png image for our websites. Like if we need an image which is going to place in different backgrounds, we can use a single transparent image inorder to have multiple images. This is done for the purpose of site optimization and performance.

The true color (png24) will be supported by all major browser except ie6. This will automatically create a grey background because ie6 cannot recogonise the alpha filter option. So what we do? Yes we got a simple Css hack to overcome this issue.

Here is the hack
HTML Code
For Example:
<span id="alImg1">
<img border="0" src="images/htw.png"/>
</span>

CSS Code
#alImg1 img { filter:progid:DXImageTransform.Microsoft.Alpha(opacity=0);}
#alImg1{ display: inline-block; }
#alImg1 { filter:progid:DXImageTransform.Microsoft.AlphaImageLoader(src='images/htw.png'); }

In the above example i have htw.png. So use the id like how i have specified and call it with in the css.

Note:
#alImg1 { filter:progid:DXImageTransform.Microsoft.AlphaImageLoader(src='images/htw.png'); }
In this case also you need to specify the image path.

Png background fix for ie6 using css

Previous we have seen about how to give hack for png image for ie6. In this post we will be knowing how to fix a png background using css for ie6.

HTML
<div class="img_txt">dhsfds</div>

CSS
.img_txt{background:url(mobile.png) repeat;_background-image:none;_background-repeat:repeat-x;float:left;width:300px;height:130px;_filter: progid:DXImageTransform.Microsoft.AlphaImageLoader(src='mobile.png', sizingMethod='crop'}

Test your Website in different Screen Resolutions in one place

Experts says that when you are publishing a website for viewers, you should optimize the web pages for 1024×768 resolution as it is still the most common size. So you must always keep in mind when you are designing a website, make sure that the layout should be good and readable in all the resolutions.

Have you ever wondered how your website appears to a visitor who might be using a different screen resolution?

Tried of changing your resolution each and every time when you are making changes?

Here is a simple way to check your web page in all the resolution in one place. Viewlike.us is the site you are looking far.

Just type the address of your web page and the tool will show you how that page will look like in different screen resolutions. You can test the layout using most common resolutions like 800×600, 1024×768 or even the iPhone and Wii browser.


Adobe Web 2.0 Productivity Workshop

Great News for web developer and web designers, here is an opportunity to have a full session of knowing the web2.0 cutting edge latest technology of Adobe Productivity Workshop.

Adobe is conducting a one day program in Chennai. So if you are interested, here is an opportunity to know the latest adobe Productivity Workshop.

Venue: Hotel Park Sheraton

Date: 16th Sep 09

Time: 9am - 5pm

Detailed Agenda
09:45am - 10:15am Registration

10:15am - 11:00am Professional website design with Adobe Dreamweaver CS4

11:00am - 11:15am Tea Break

11:15am - 12:45pm Rich interactive content development with Adobe Flash CS4 Professional

12:45pm - 01:15pm Web prototyping and image editing with Adobe Fireworks CS4

01:15pm - 02:00pm Lunch Break

02:00pm - 02:30pm Audio creation and editing with Adobe Sound booth CS4

02:30pm - 03:15pm New dimensions in digital imaging with Adobe Photoshop CS4 Extended

03:15pm - 03:45pm Inspired vector graphics creation with Adobe Illustrator CS4

03:45pm - 04:00pm Tea Break

04:00pm - 04:30pm Flexible web publishing with Adobe Contribute CS4

04:30pm - 05:00pm Sneak peek of Adobe Flash catalyst

Hurry! only limited seats. Here is the link to Register.

Website to capture screenshot

Most of our website have contact forms where visitors can fill in their email address and send a message directly to the site owners with some limitations. But some issues might be clear or some might not.

The visitor cannot attach image files with the message.

Here is a easy solution. To solve this very problem and make things a bit more convenient for your visitors,SnapABug has released a simple JavaScript based Help widget that can be added to any website with a simple copy and paste.

The Snapabug widget will add a "help" button to your website and when visitors click this help button, they can not only send a message to your email address but they can also chose to include a screen capture of the web page with the message.

SnapABug will automatically attach a screenshot with the browser’s user-agent string and OS details of the visitor. And the Help widget is absolutely free

Making usability a practice

As we all use form in the design to fill user information or such. Similarly we also use radio option to select and will give label to it. But the common usability mistake is when we click on the label, the radio option will not be selected. We need to do that. So here is a simply way

Using the ‘for’ attribute allows the user to click the label to select the appropriate input fields within a form. This is especially important for checkboxes and radio fields to give a larger clickable area, but it’s good practice all round.

Simple animated drop down menu using jquery

This tut will help you to have a simple animated drop down using jquery. Before using this please add the js file from jquery website. Refer the site http://jquery.com/ for more details. You can download the minified version or the developer version.

Once you download and include in the page then using the below steps.
HTML

<ul class="drospdown">
<li><a href="#">A Website #1</a></li>
<li><a href="#">A Website #2</a>
<ul>
             <li><a href="#">Indoor</a></li>
             <li><a href="#">Outdoor</a></li>
            </ul>

</li>
<li><a href="#">A Link #1</a></li>
<li><a href="#">A Link #2</a></li>
<li><a href="#">A Website #3</a></li>
<li><a href="#">A Website #4</a></li>

<li><a href="#">A Link #3</a></li>
<li><a href="#">A Link #4</a></li>
</ul>

Javascript

function mainmenu(){
$(" .drospdown ul ").css({display: "none"}); // Opera Fix
$(" .drospdown li").hover(function(){
$(this).find('ul:first').css({visibility: "visible",display: "none"}).slideDown(400);
},function(){
$(this).find('ul:first').slideUp(400);
});
}
$(document).ready(function(){
mainmenu();
});

this will give you an animated drop down menu...

Png background fix for ie6 using css

Previous we have seen about how to give hack for png image for ie6. In this post we will be knowing how to fix a png background using css for ie6.

HTML
<div class="img_txt">dhsfds</div>

CSS
.img_txt{background:url(mobile.png) repeat;_background-image:none;_background-repeat:repeat-x;float:left;width:300px;height:130px;_filter: progid:DXImageTransform.Microsoft.AlphaImageLoader(src='mobile.png', sizingMethod='crop'}

Perfect Digital Photography Secrets: How To Use Your Camera's Flash


You have to take full control of your digital camera's flash. Why? Because digital
cameras and their build-in software are pre-programmed and make a few assumptions..
For example:
There are sensors inside your camera that measure the percentage of illumination in
the scene at which your camera points. If the sensors measure low illumination then
your flash will fire. That is because your camera is pre-programmed with the assumption
that flash will improve the photograph in a low-illumination environment.
On the other hand in a high-illumination environment the flash will not fire because
the camera will assume it's not necessary. After all it's dark out there!
The issue with these assumptions is that there are certain situations when you want
an opposite result..
For example there are times when you want to shoot the perfect digital photography in
a low-illumination environemt without using the flash.. e.g. when you are in a dark
room with a candle burning and no other light sources.. If that's the case you need
to be really steady for the photograph to be sharp. You may want to use a tripod to
achieve better results. If you do it right you will have a perfect digital photography
with beautiful warm orange/red colours.
Remember that the straight light coming from the flash gives a cold commercial look to
your photographs. That could be ok in some cases but not in all cases.. You should
decide whether to use flash, not your camera.
But what happens when working in Bright Light, high-illumination environments?
Then, the flash will not fire! Of course that saves battery-power but what are the
results of your perfect digital photography? You definitely don't want to lose in quality
right?
Imagine when you want to take the perfect digital photography of a person wearing a hat
and the sun is overhead in the sky shining.. Then you will notice that the person's face
will be in dark shadow because of the hat! But even if there's no hat, you will usually
see shadows under the chin or under the person's eyes.. So what you should do is fill
those small shadows with light using your camera's flash!
Again, YOU should decide whether to use flash or not, and not your camera.. YOU should
take control of your camera's flash..
Today's digital cameras have five basic flash settings:
- Setting #1:
Automatic Flash: This is where your camera is pre-programmed to make assumptions
depending on the level of the environment illumination and use the flash accordingly.
- Setting#2:
Automatic Flash with Eye Reduction: Again, the camera uses its software to determine
when the flash will fire but there's also some type of red eye filters to reduce the red
eye effect.
You camera will probably automatically select, by default, one of the above two settings.
I recommend to never use the above settings if you're aiming for the perfect digital
photography.. And why is that you may ask..
As I said before YOU should be the one who decides whether to use flash or not.. And
furthermore the eye reduction filters will not always do a good work and will confuse
your subjects in most cases..
I recommend to make use of the following settings depending on the scene and the subject
you're trying to shoot..
- Setting #3:
Flash Always: With this setting enabled your flash will fire in all cases. You may want to
choose this setting when you want to fill small shadowed areas with light.
- Setting #4:
Flash Disabled: Your flash will not fire no matter how illuminated the environment or the
scene is.. Make use of this setting when you want to shoot in a low-illuminated environment
e.g. a dark room with a candle burning..
Just remember that in a low-illumination environment you have to be really steady in order
to shoot the perfect digital photography
..
- Setting #5:
Slow Shutter Flash: This is a very underestimated setting and the least used.. If you choose
this setting your flash will fire ocassionally but the shutter will remain open for a longer
time than usual. This will allow you to capture the subject illuminated by the flash, but it
will also allow other lighting sources (like a candle's light) to record themselves.
This setting is perfect if there is high illumination on the background while infront of the
subject there's certain darkness. For example when you want to shoot a person in front of a
casino at night.
So.. If you're aiming for the perfect digital photography you should be able to switch between
those five flash settings found in almost all digital cameras these days. Have a look at the
camera's manual for more information on these settings. They are really importand.