1. Import images
On this screen, you can choose the files to which you will add the watermark. You can choose an unlimited number of images from the disk of your computer as well as from the images that were already exist on your Flickr account. After the pictures are imported you can start adding watermark or saving the imported pictures.
To you convenience we inserted batch resize and batch rotate features on PicMarkr. To use these functions you need to select one or several imported pictures and press "Resize selected" button or "Rotate CW / CCW" button.
2. Adding watermarks
This is the main interface of the program, which allows you to use all the watermark tools and customize your photos watermarking. First of all, you need to choose, what your watermark is going to look like: text (which could be a digital photo signature or just image timestamp), image or tile (which could be useful for artwork protection).
 If you want to automate your digital photo protection, it’s easy to create watermark templates for different kinds of photos. In every preset you can set size, opacity and align of the watermark. As soon as PicMarkr Pro is a batch watermark software, you can apply watermark to a couple of photos in one click. Also, you can add multiple watermarks to one image, if it is necessary.
3. Saving images
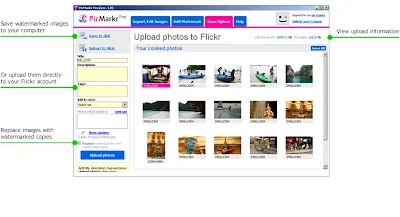
On this screen, you can save watermarked images or upload images to Flickr. You also can use menu Advanced options in order to rename one or several files.
 In case you are an owner of Flickr pro-account the option of replacing the pictures is available to you. This function works if you imported the pictures from Flickr, watermarked them and want to replace the original photos with their watermarked copies.
Source:picmarkrpro.com Buy This Product

